HDR Photography Tutorial Part 2 – How to Pre-Process

Before you get busy with the HDR processing, take a few minutes to clean up your RAW files first to avoid enhancing any nasty little issues like chromatic aberration and excessive noise. These tips are also part of my standard processing workflow regardless of HDR, so you should find this HDR photography tutorial useful.
What is Chromatic Aberration?
Sounds like a disease right? Chromatic aberration is a common problem, especially with zoom lenses. It’s where you’ll see these horrific green, red, blue or purple halos around the edges of objects in your image. If you don’t clean this up before combining bracketed shots in your HDR app, you’ll actually be increasing the visibility of these evil little gremlins, so make removing them part of your workflow to ensure the best image quality in your HDR shots.


Sharpening
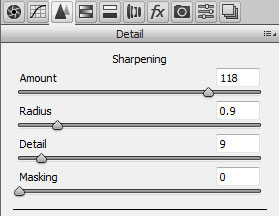 I like to do a little sharpening in Adobe Camera RAW before I start editing my image regardless of HDR or not.
I’ll usually add a final pass of sharpening at the very end of my editing process but the first pass, during RAW editing, is just a subtle little tweak with the following settings that work well for a 5616 x 3744 pixels (21 megapixels) image.
You’ll need to adjust your settings to suite your resolution. Experiment with these sliders but be sure to only make subtle improvements. Don’t overdo it this early in the game.
Noise Reduction
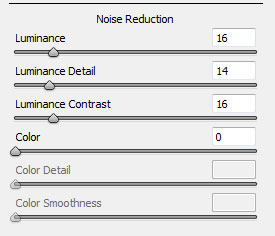 Ideally, I won’t have to do any noise reduction during my pre-processing stage but if you make a mistake, like setting the wrong ISO during shooting, you’ll want to check the noise levels before starting your HDR processing. If there is excessive noise, try a subtle first pass of noise reduction with ACR settings like these.
White Balance
This should only need fixing if you made a mistake during shooting but there may be occasions when you want to change the white balance for creative reasons. If either of these scenarios is the case, it’s best to fix this this in ACR before starting with HDR.
Leave Everything Else Untouched
Don’t be tempted to tweak anything but these four vital tools. I’ve tried doing HDR processing of bracketed shots that had their shadows and highlights repaired before starting the HDR processing and they don’t work as well. Our objective with the pre-processing stage is to correct any severe colour and basic image quality problems so that things stay realistic during HDR processing. The last thing we want to do is boost the worst parts of our image and end up with seizure inducing HDR atrocities that ought to carry a government health warning.
Exporting from Adobe Camera Raw
When you’re done tweaking each bracketed RAW file you’ll want to export the tweaked file as a TIFF file. I go for 16 bit with the sRGB colour profile. These exported TIFF files are what we’ll load into our HDR app to create the final HDR image.
You’re Ready for HDR
That’s it, you’re all done with your pre-processing and ready to load the TIFF files in to your HDR app of choice. Read my HDR Tutorial Part 1 – How to Create Realistic HDR Photos to learn how to do this tastefully and keep it real.
My final HDR Photography tutorial will cover some of the cool things you can do in Photoshop to really make your HDR images pop. Find me on Google+ to get the latest updates or join my mailing list by signing up for a free account here at Fototripper where you’ll be able to download my Free Desktop Wallpapers and Free Photoshop Actions.
If you have any questions or tips, please feel free to post a comment below.


very nice work,
Anxiously awaiting part 3!